
Spondylosis
Physical Therapy
by the Brain and Spine Neurosurgical Institute
Spondylosis, also known as spinal osteoarthritis, is a degenerative condition that affects the spine. It primarily involves the deterioration of the intervertebral discs, which are the cushion-like structures between the vertebrae, and the facet joints, which are the small joints that connect the vertebrae in the spine. Spondylosis is commonly associated with the aging process, as the wear and tear that occur over time can lead to the breakdown of these structures.
Spondylosis is a common condition, especially among older adults. It can be diagnosed through physical examination, imaging studies like X-rays or MRI scans, and assessment of symptoms. While spondylosis itself is not reversible, its symptoms can often be managed through various approaches:
Physical Therapy: Exercises that focus on improving flexibility, strength, and posture can help alleviate symptoms and improve function. Keep reading for some physical therapy exercises.
Pain Management: Over-the-counter or prescription pain relievers can help manage discomfort associated with spondylosis.
Lifestyle Modifications: Maintaining a healthy weight, practicing good posture, and avoiding activities that exacerbate symptoms can all contribute to managing spondylosis.
Injections: Corticosteroid injections or nerve blocks might be used to target specific areas of pain and inflammation.
Surgery: In cases where conservative treatments do not provide relief and symptoms are severe, surgery might be considered.
Cervical Spondylosis Physical Therapy
Here are a few simple exercises that might help you with cervical spondylosis. Please note that each person is an individual and has their own medical problems, therefore you might experience different types of pains that others may not feel. This should be a caution to you not to continue and you can always consult us at any time.
Cervical Retraction
Our first exercise is cervical retractions. The goal of this exercise is to lengthen the muscles in the back of your neck. During this exercise, ensure that you are standing up straight with your shoulders back.

Rotate your shoulders outward with your palms facing down and fingers pointing backwards.
Retract your neck back while you inhale.
Hold this position for about five seconds
Return to a neutral resting position while you exhale.
It is very important to keep your chin level during this exercise. You can do this by keeping your eyes fixed on a spot in front of you. Do not roll your head upward or downward while doing this exercise.
Do this exercise three to five times.
Cervical Rotations
Our second exercise is cervical rotations.

Rotate your shoulders outward with your palms facing down and fingers pointing backwards.
Slowly and gently turn your head to the right and left holding the end range of each position for two seconds.
Inhale as you turn your head to either side and exhale as you return to neutral.
Repeat this exercise about five times in each direction.
Scalene Stretch
Our third stretch focuses on the scalene muscles. The scalenes are a group of muscles on either side of your neck.

Position your shoulder on the same side as the muscles in your neck. This shoulder should be depressed. We can accomplish this in one of two ways.
Hold on to the edge of a table or chair
OR hold the shoulder down with your opposite hand
Once your shoulder is positioned properly, we want to tile our heads slightly away from the depressed shoulder
Title your head upwards as if you are looking at the sky
You should stop when you begin to feel a stretch in the side of your neck opposite to the direction your head is tilted in
Hold this position for about 20 to 30 seconds
Levator Stretch
Last is the levator stretch. Your levator connects the upper border of your shoulder blade to the side of your neck.

Rest your arm over your head on a corner wall or door frame. Do not push against the wall, just relax and rest your arm while standing up straight.
Turn your head away from the arm that is elevated and tilt your head forward slightly.
Stop when you begin to feel a stretch on the side of your neck closest to the arm that is elevated.
Hold this position for 20 to 30 seconds
Lumbar Spondylosis Physical Therapy
Here are a few simple exercises that might help you with lumbar spondylosis. Please note that each person is an individual and has their own medical problems, therefore you might experience different types of pains that others may not feel. This should be a caution to you not to continue and you can always consult us at any time. We are going to discuss four exercises that may be helpful to you if you've been diagnosed with lumbar spondylosis.
Flexion Extension Exercise
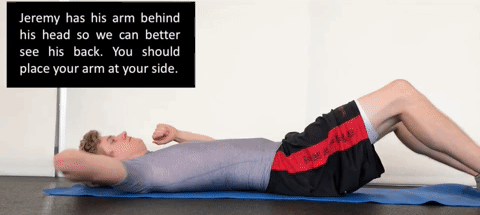
The first exercise is a flexion extension exercise. It is best to do these exercises on the floor; either on a soft rug or an exercise mat. If you have difficulty getting up and down from the floor, you can do these exercises on a bed, preferably with a firm mattress.

Begin by lying down with your knees bent and your arms at your side
Concentrate on the position of your belly button throughout this exercise. Let your belly button sink into the bed or into the floor and feel your back contact the surface. Do not go beyond this flat position. You should not feel your bottom lift up at all and all the motion should occur in the lower spine.
Hold this position for five seconds.
Bring your belly button toward the ceiling until your lower back arches just a little bit.
Stop and hold this position for another five seconds. Again, your bottom should not leave the surface of the ground or the bed.
Breathe in when you arch upward and breathe out as you flatten your spine.
Repeat this exercise 5 to 10 times
Piriformis Stretch
Our third stretch is the piriformis stretch. The piriformis is a muscle that extends from the base of your spine, called the sacrum, to the outside of your hip.
Lie on your back with your knees bent and your arms at your side.
Cross one leg over the other so that your ankle is resting on the lower thigh of the opposite leg.
Place your hands just below the knee or behind the thigh of the stabilizing leg and slowly pull this leg back towards your shoulder.
Stop when you feel a slight stretch in the buttock region or in the upper thigh
Keep holding this stretch for 20 seconds
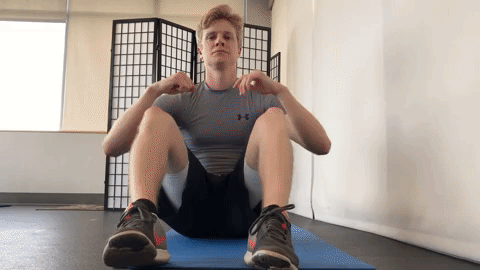
Step and Reach Exercise
The last exercise, Step and Reach, aims to improve your posture by promoting an upright position of the entire body.

Begin with your feet together.
Take a step forward on one leg while the other leg remains in place. After you have planted your foot, try to shift your weight to this leg.
Reach upward toward the ceiling with the arm opposite your forward leg. In this position, your shoulder, hip, knee, and ankle, opposite your stepping foot, should all be in a straight line towards the floor.
Hold this position for several seconds and then step back to your original position.
Repeat exercise with the opposite leg and arm.
Repeat 20 to 30 times, switching from one leg to the other as you go.